
Nuvi can’t deploy a translator without an official “identity.” Before you write real behavior, you must create a bot user in Discord’s Developer Portal. This gives you a token (a secret password) your code will use to log in.
1. Open the Developer Portal
Go to the Discord Developer portal and log in with your Discord account (or create one if you don’t have one).
2. Create a New Application
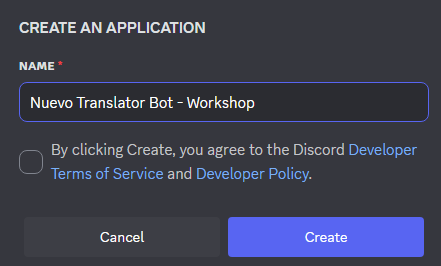
Click New Application.
- Give it a short, clear name (example:
Nuevo Translator Bot). - Click the terms of service checkbox and then Create.
3. Add a Bot User
Inside your application page:
- Click Bot in the left menu.
- Click Add Bot → Yes, do it!
- (Optional) Give it an icon and nickname.
4. Copy the Bot Token (But Keep It Secret!)
Still on the Bot page:
- Click Reset Token or Copy Token.
- This long string is like a password for your bot.
- Never post it publicly.
 Warning: If someone gets your token they can control your bot. If it leaks, reset it immediately.
5. Enable Message Content Intent (Important for Translation!)
While still on the Bot page:
- Scroll down to Privileged Gateway Intents
- Turn ON the Message Content Intent toggle
- This lets your bot read messages (required for auto-translation)
Warning: Without Message Content Intent enabled your bot cannot read messages, so auto-translation will not work.6. Invite Your Bot to a Server
- Click OAuth2 → URL Generator.
- Under Scopes check:
botandapplications.commands. - Under Bot Permissions, select only what you need now (start simple:
Read Messages/View Channels,Send Messages). - Copy the generated URL, paste it into your browser, choose a server you own or manage, and authorize.
Your bot is now registered and added to your server! It won’t come online until you run your Python code with the token. Once it’s online, you’ll start turning it into the translator helper Nuvi needs.
Nuvi tip: If the invite URL fails, re-check that both `bot` and `applications.commands` scopes are selected.